The Employee page enables leave management system administrators to manage all users (employees) within the system, which includes adding, editing, and archiving employee records.
The displayed employee list initially shows key information for each employee, such as name, employee code and department/location, but you'll also notice the colour-washed columns for Holiday and Sickness - these columns give a brief summary of how much entitlement is available/used by status (e.g. pending/approved). Additional columns may be added for any or all leave types by selecting the required values in the 'Columns' filter at the top of the page (e.g. Maternity).
To add a new employee, start by pressing the "Add" button; a new panel with multiple tabs will appear; complete as many fields as possible on each tab. Where possible, fields will be automatically populated with any organisational defaults (e.g. working days) but these can, of course, be overwritten to meet the employee's exact requirements.
When you're happy with the information you have entered, press the 'Save' button to commit the new user to the system.
Once successfully committed to the system, an email will be sent to the new employee with details of how they may login.
N.B. If you're a "Pay Monthly Customer" (and not within the free trial period), creating a new user will automatically add them to your monthly invoice (calculated pro-rata) once the employee has been active for 5 hours; so, if you were to create a user in error but then delete the record within 5 hours, you will not be charged for it. Further details of billing can be found within our help section Accounts and Invoicing.
Tap on the employee record you wish to edit and, when the details panel appears, just press on the 'Edit' button. You may then make any changes you want, across the multiple tabs, and commit it to the system by pressing "Save" (or "Cancel" if you change your mind).
Tap on the employee record you wish to archive and, when the details panel appears, just press on the 'Archive' button. You will then be asked to confirm, and the employee record will be archived. Archived employees can be restored at a later date, if required; see the 'Restoring an employee' section below.
Tap the toggle switch at the bottom of the employee list to change the view from listing active employees to listing archived employees. Tap on the employee you wish to restore and, when the details panel appears, just press on the 'Restore' button. You may then make any additional changes you want, across the multiple tabs, and commit it to the system by pressing "Save" (or "Cancel" if you change your mind).
If one of your users should forget their login details, then tap on the relevant employee record and, when the details panel appears, just press the "Security Reset" button. An email will then be sent to the user with details on how they may reset their login.
When you add a new employee record or tap on an existing record, a details panel is shown with the following tabs:
- User - this is the core information for an employee, where you can set details such as their name, job title, department, email address (used for login and any correspondence), grant an employee administrative rights and set a profile picture (employees may set their own profile picture later).
- Address - home address for the employee. Whilst this information is not mandatory, it can be used to keep address details, if required.
- Shifts - select the shift patterns that the employee can book leave for; you can select as many as required but we suggest only adding the shifts that are applicable. The selected shifts may be arranged into a hierarchy - the shift at the top of the list will be used as default when an employee requests leave within their calendar.
-
Entitlement - the employee's start date should be defined on this tab, as well as the unit indicating whether they book their entitlement off in days (shifts) or hours. If the employee were to leave your organisation, you may set their end date here too.
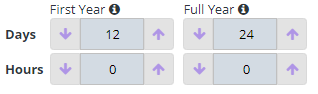
An employee's holiday and sickness entitlement should also be defined here; each entitlement is split into either day or hourly entitlement, and then further split based on first/last/full year of entitlement.
For example, if an employee's standard leave per is year 24 days, yet they started 6 months into the current year then, dependent on your organisation's policies, you might set their 'First Year' value to 12 and their 'Full Year' to 24.
The system is defaulted to calculate the pro-rata values automatically, but this can be enabled/disabled by changing the 'Auto calculate entitlement' switch.
You may also give the employee the ability to self-authorise their leave requests, via the 'Self Authorisation' switch; enabling it means that any leave the employee requests will be by-pass the need for a team leader to approve it.
- Work Days - the employee's standard working days (e.g. Monday to Friday) may be defined on this tab together with switches to indicate if they work bank holidays. The purpose of these values is to enable the system to ignore non-working days for an employee's entitlement calculations when they make a booking request.
-
Teams - BOOKADAYOFF uses a role based mechanism for setting leave authorisation levels; this allows for fast and efficient management of controlling who can see and/or authorise leave requests.
For each team that the employee is a member of, first set the level that the user holds within that team (if any), then define who else's 'team bookings' they should be able to see on their calendar, and finally whose 'team bookings' they may authorise.
- Bookings - the bookings tab offers a quick method by which to see all the leave requests for a specific year for the employee; results may be filtered by year, leave type, and leave status by adjusting the options in the 'Filters' area.
